

This is a guest post from a great friend John MacLean. John has been in the photography business since 1987 and knows a thing or two about a thing or two. To see some of his excellent work and contact him visit his website. John originally wrote about this topic over at his facebook site.
I see a lot of posts with DSLR exposure info shown, and surprisingly a lot of people shoot f/22 on scenes that not only don’t need it, but they’re compromising their shutter speeds and ISO needs by greatly limiting the light to their sensor.
While you might be tempted to achieve great Depth of Field (DOF), you’ll loose incredible amounts of actual sharpness from an optical principle called diffraction. As the aperture is stopped down past the middle of the range, the sharpness of the actual focused area (plane of focus) and the rest of the scene becomes much less detailed. Typically the sharpest lens openings are about 2 stops closed down from wide open. Example, if you have an f/2.8 lens then you’d find f/5.6 or thereabouts would be the highest resolution (most acutance). But sometimes you may need more DOF than f/5.6 offers in certain cases. I will shoot down to f/11, but that’s about as small an aperture as I will go.
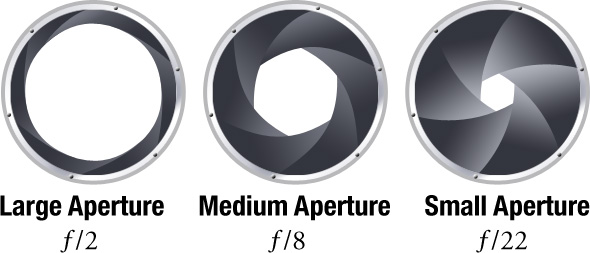
f/22 DOF and sharpness are generally misunderstood and considered the same. That couldn’t be the farthest from the truth. If your camera has Live View, then try this simple experiment. With your camera on a tripod, or other stable place, set it to Aperture Priority and your lens to Manual Focus and its maximum aperture. Then turn on Live View, zoom the LV to maximum (2 pushes of the magnifier button on Canon), manually focus your lens on something in the center of your frame, then start stopping the lens down while looking at the LV LCD. Past the 2 stops down you’ll start to notice your sharpness going from Rice Krispies to overcooked oatmeal at f/22.
There’s a technique called Focus (Bracketing, Blending, or Stacking – you choose) that allows you to combine images shot at apertures of maximum sharpness with different focused planes, for instance near, medium, and infinity. This post shooting process is done with computer software. It’s very useful for macro work where the DOF is incredibly shallow, even at f/22! But that’s another tip altogether!
Conversely, you may want super shallow DOF for interesting isolation of your subject against a blurred background (a.k.a. Bokeh effect). In this instance at f/2.8 or wider, depending on your lens focal length and camera’s sensor size. If you have a very fast telephoto lens of f/1.4 or f/1.2 and a full frame 35mm sensor, then you can reduce the DOF to razor thin bare minimum. However, this can be very difficult to attain critical focus, say on both eyes of a head and shoulders portrait, especially if they’re not turned straight on to you. And like f/22, there’s a trade off in sharpness at the actual plane of focus, unless you have a very high quality prime lens, typically costing over $1500 USD. And pricey isn’t a guarantee you’ll nail focus!
While all of this is of little concern for posting 1000 pixel long JPGs on the web, it will quickly become compelling when you want to put that award winning landscape enlargement on your living room wall or in a contest print exhibition. Once you print larger than say 12×18 or 16×24″ you’ll start to appreciate the intricacy of actual perceived sharpness vs. DOF.
These are some great tips John. If you are thinking about using those smaller apertures (f/22) to achieve longer shutter speeds then a great alternative is to use an ND filter to block light entering the sensor.
Are you using f/22 currently? Let us know your thoughts in the comments below.


